
Are you looking for the best payment solution for accepting payments on your WordPress website. Stripe are one of the most popular payment processing company in the world. It allows you to easily accept credit card payments on your website. Today, we’ll see how to use Stripe for payment in WordPress website.

Importance of Stripe for Payment
If you want to accept credit card payments on your WordPress website, there’re no any other easiest solutions than Stripe. Although I do not claim this, you will have to go through a lengthy process of merchant account for other payment solutions.
Stripes are one of the best payment solutions for running an internet business that prevents you from going through the lengthy process of a business account.
That is to say, they allow anyone with legitimate business to accept credit card payments online. Only you need to create an account on the strip.
Stripe features are suited to you and customers. If we talk about the features of the customers then they don’t need to create any type of account on Stripe and other websites. Only, They can simply enter credit card on the website to make payment.
Stripes make it easy for you to accept credit card payments on your website. To accept Stripe payments with WordPress and WooCommerce, you must create a Stripe account and host a WordPress site.
Note: Stripe requires your site to have SSL certificate (https) on the page, where you’re adding a live payment form. Because it allows you to send credit card data securely to Stripe. See our guide on what’s SSL certificates.
Connect Stripe with WordPress Site
To connect Stripe to your website, firstly you need to install and activate the world’s most popular form builder WPForms on a WordPress website. Then you can go to ahead and install and activate the Stripe addon.
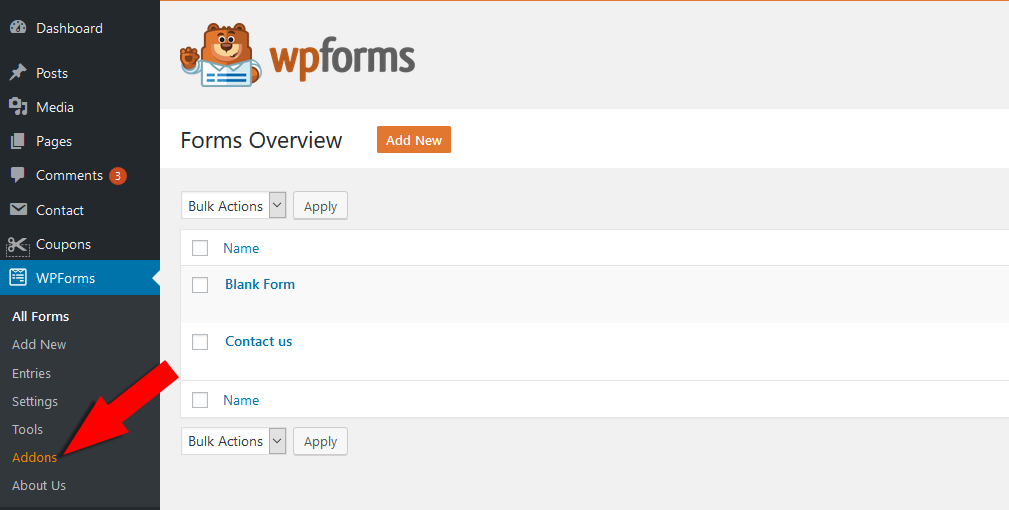
Install Stripe Addon in WPForms
To install the Stripe addon, you go to on WPForms » Addons and click addon link which will take you to the WPForms Addons screen.
Once you’re reach there, you’ll see all addons available with your license level.
To search for a specific addon, you can type the name of the addon into the Search Addons field located on the top-right corner of the Addons page.

After getting the addon you need, click on the Install Addon button located in each Addon.
once, you have done the Addon install and activate, then your Addon is ready to use, the status will show: Active
Connect Stripe with WPforms
Once your Addon is ready, you’ll need to open WPForms » Setting in the left menu of your WordPress website. Now click on Payment Tab here.

If you’d like to adjust the currency, go ahead and select the option you need from the Currency dropdown before proceeding.
Go to the scroll down stripe section. Here you should see the connection status. If your WPForms are not connected by stripe then you need to click the ‘Connect with stripe‘ button.

Next, you will be asked to authorize the connection between the your form and the Stripe.
To connect your form with Stripe, you need to connect stripe to your WordPress site by entering the API keys. You can get these API keys from your Stripe account setting.
Once, you have entered the API keys in WPForms setting, click on save button and save all settings.
Once you agree to all the requirements then it directs you to the re-admin your site’s admin area. Here you can confirm the “Connection Status” by looking at the green check mark.
Now, you can easily accept payments using Stripe in WordPress.
Adding Stripe to Your Forms
Now that you have connected Stripe to your WordPress site, you can start adding Stripe Payments to your forms.
Now, you can create a new form or edit an existing forms.
WPForms comes with ready to use form template, you con select Order/Billing form, Donation form, or create blank form.
You can add new fields as a credit card by clicking them from the left column. And you can easily edit these by clicking on them.
After you add this field, you need to click on the Payment » Stripe.

Now, you need to check the box “enable stripe Payment” option and enter a description for payments. In addition, you can also select an email for Stripe Payment Receipt where stripe can send receipt.
Finally, completing all the Stripe payment setup process, Don’t forget click on the Save button.
Add Payment Form with Your Post/Pages
WPForms allow you to add your forms to many places on your website like posts, pages, sidebars.
First let’s take a look at the most common post / page embed option.
Firstly, you need to create new posts or open an existing page in your WordPress. After that, add new block in your opened pages or post and click on Add WPForms icon.
Next, WPForms widget will appear inside in your selected block. Now, click on the WPForms dropdown and pick which one of the forms you’he already created. Here we will select the order form.

After adding your form to your post, you can click on Publish button. Now, your form will appear in your website.
Test Stripe Payment in Your Forms
Once you complete the process, you need to check it. The best way to test your form is to submit an entry and you have to follow the same steps as your user.
To begin, you’ll need to first login to your Stripe account. After login, look at the menu on the left and select the Payments option.
Next, enable by clicking the View Test Data button at the bottom of the menu.
This will show you an overview of the test payments received in the Stripe account. In addition, you can see more details for individual payments. To do this, go to the row for that entry and click on the three dot option. Then select View payment detail.
After undergoing testing, you can successfully Publish your form among your users.
Note: When you are done testing, remember to deactivate Test Mode in Stripe before allowing users to submit payment in your form
I hope that this article helps you to receive payment from credit card on your website. Also, if you liked our article, then please follow us on Facebook and Twitter.

