Are you looking to make your blog post more attractive and engaging? So to do this, one can take advantage of the embed Instagram feed and post features.
Showcasing beautiful photos and videos on your website can be a great way to drive engagement to your users.
Not only this, the traffic to your website can play a great role in increasing your Instagram followers.
Adding and embedding Instagram content on the website will increase your exposure (potential conversions) and also allow followers to interact with you on both platforms.
In this article, we will teach you how to embed Instagram posts and feeds on the WordPress website in just a few easy steps.
But before that, we’ll tell you how embedding Instagram posts on websites can help in business.
The benefit of Adding an Instagram Feed to a Website
There are a lot of benefits to showing your Instagram account content on a WordPress website.
First, you can show your visitors new content to make your website more attractive. In addition, Instagram feeds are a great option for increasing engagement and keeping visitors on your website.
We have identified some of the benefits of adding Instagram content to the website as follows:
- You can show video reviews and testimonials on Instagram that encourage viewers to buy the product.
- You can link your Instagram posts directly to the sales page with a shoppable Instagram Feed.
- With beautiful Instagram posts on the site, you can get your visitors to return as Instagram followers.
- you can display product reviews, showcases, buyable images and other user-friendly content in your Instagram feed as social proof to drive more sales.
As you can see, you can do so much by adding Instagram posts to the website. You just need the right instructions to grow your business fast.
So, let’s see how to embed the Instagram feed on the website.
How to Embed Instagram Post to WordPress Site
Using a plugin is one of the easiest ways to embed an Instagram feed on a WordPress site.
There are four simple steps to adding the Instagram feed to our site.
1. Install the social feed plugin
First of all, we will choose the right plugin here. In this tutorial, I will use a Social Feed Gallery as the right selection of plugins. Because it is free and allows you to easily display Instagram content on the website.
To install the plugin, go to your WordPress dashboard and click on Add New under the Plugins menu.
Now, you will come to the plugin page. Type Social feed in the search bar on the top right corner of the page.
The Social Feed plugin will appear on the page. Now you click on the Install button and then click on Activate button to activate the plugin.
If you’re a beginner, you can visit our How to Install a Plugin in WordPress guide for help with installing the plugin.
2. Connect your Instagram account with the Plugin
Once the plugin is successfully installed, you need to connect your Instagram account with the plugin.
To connect the Instagram account, click on the Social Feed Gallery from the WordPress menu.
Now, click on the Account tab from the social feed gallery page. Select the type of account you want to connect.
If you don’t have a business account and want to create a new one for your business.
I am going to connect my personal account here. To add a personal account, click on the Add Person Account tab.
It will redirect you to the Instagram login page. Enter the login details of your Instagram account which you want to connect.
After entering User Id and Password, click on Login and click Authorize.
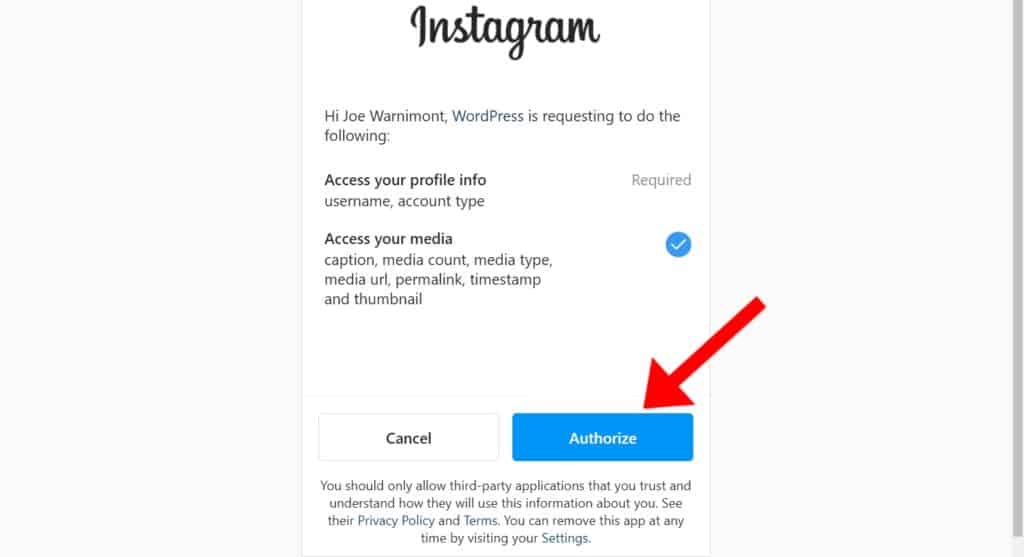
Now, you can see that our Instagram account has been connected to the plugin.
3. Create your Instagram feed
To add the Instagram feed to our site, we need to first create a feed.
To create the feed, click on the Feeds tab from the social feed gallery page. And click on the +Feed button to create a feed.
Now, you need to select how you want to display the feed on your website. I am going to select this one (carousel). Next, enter the number of images you want to show on your site. After that click Save and then click Close.
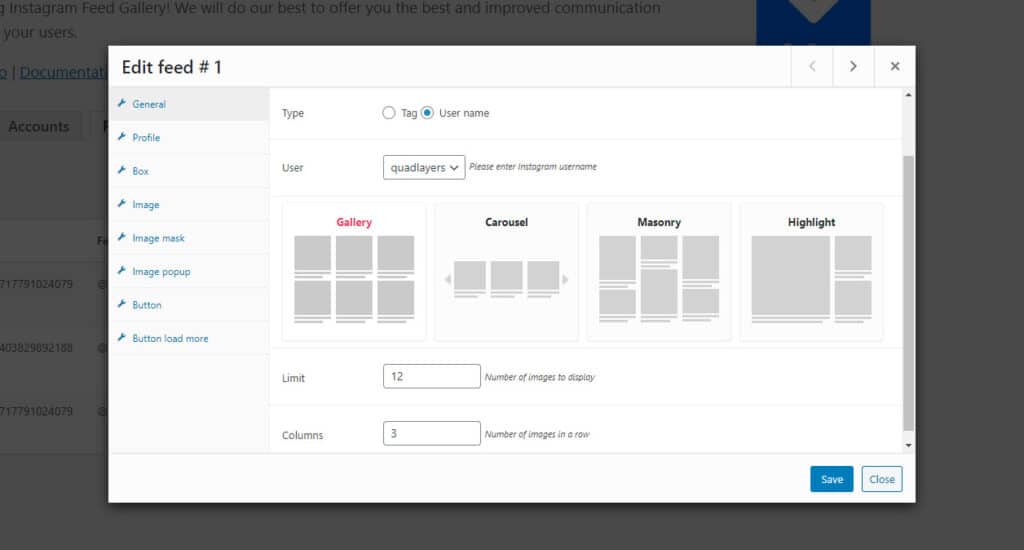
Finally, you can see that our feed has been created.
4. Add this Instagram feed to your Website
Next, go to the final step to add an instagram feed to our site.
Copy the shortcode of the feed you just created and paste it on the page. Where do you want to display your Instagram images?
Now, you need to go to the page or post where you want to add the feed and click the Edit Page.
To add an Instagram feed to the post, click the plus (+) sign to add a new block in the WordPress editor and search for “shortcode”.
Now, paste the ‘shortcode’. which we have copied earlier.
If you want to give a heading to your Instagram feed. Again click on the + icon and heading, enter the name you want and click the update button to update changes to the website.
Finally, Instagram feed will be added to your website.
If you post anything new on your Instagram page, it will automatically be updated on your website.
How to add an Instagram post to your blog post
First, in your Instagram account, select the particular post that you want to add to the blog post.
Just go to your Instagram post which you want to add to your blog post. Click the three dots (…) in the right corner of any Instagram post ( picture and video) to open more options.
Next, click on the Copy Link when more options appear in the popup.
After that, you need to go to the blog post where you want to add an Instagram post and click the Edit Page.
To add an Instagram post, click plus (+) sign to add a new block in WordPress editor and click Instagram block.
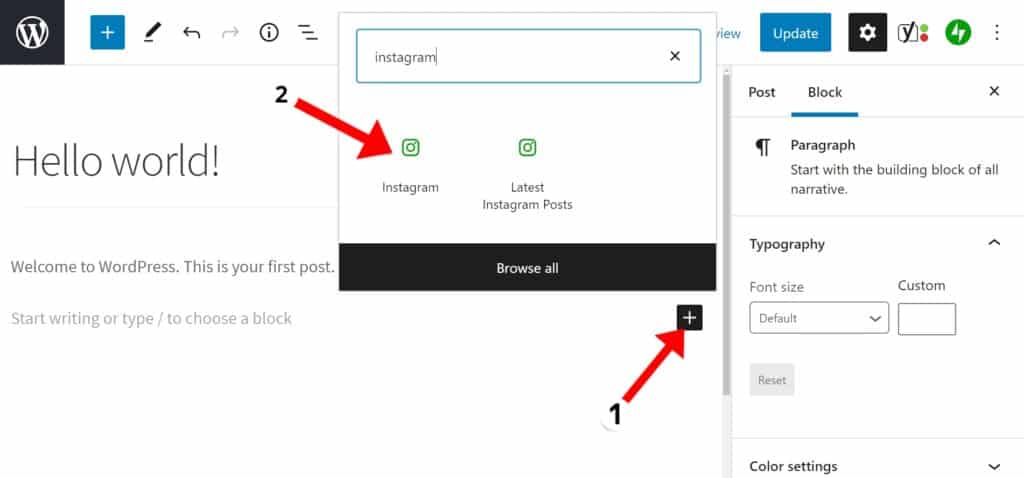
Next, paste the URL which we have copied earlier and Embed.
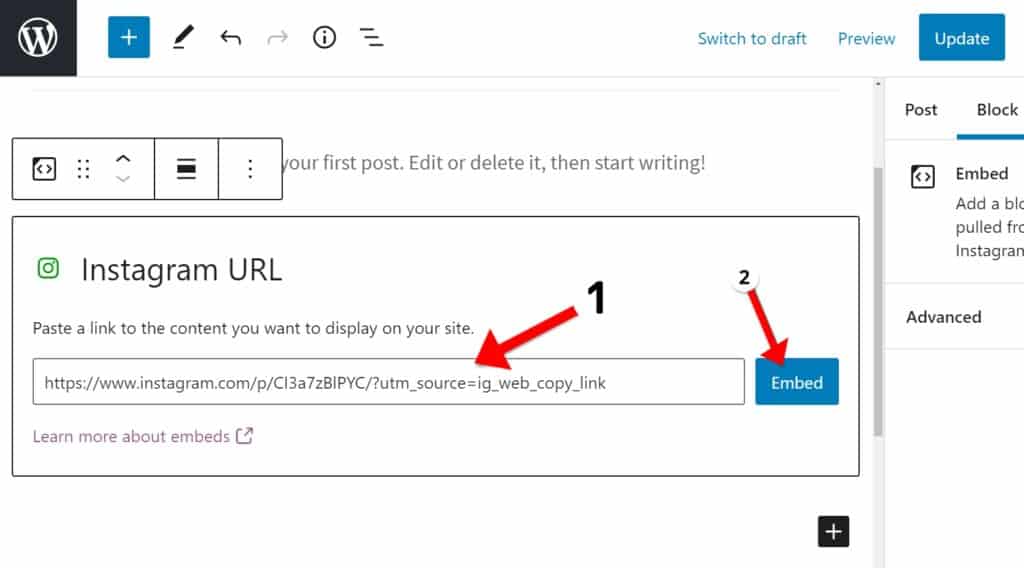
Now, you can see that your Instagram post has been added.
Finally, you’ve successfully activated an Instagram feed or post on your website. Which will be interactive and useful to generate good traffic and conversions in future.
We hope this article helps you to embed Instagram to your WordPress website. Furthermore, you can also checkout related articles on how to increase Instagram followers.
Don’t forget to share this post!


